Keras 정리 2
본게시물은 Keras 링크의 내용을 공부하며 한글로 번역 및 정리한 문서입니다.
Keras: the Python deep learning API
Keras: the Python deep learning API
State-of-the-art research. Keras is used by CERN, NASA, NIH, and many more scientific organizations around the world (and yes, Keras is used at the LHC). Keras has the low-level flexibility to implement arbitrary research ideas while offering optional high
keras.io
import numpy as np
import tensorflow as tf
from tensorflow import keras
from tensorflow.keras import layers
inputs = keras.Input(shape=(784,))
img_inputs = keras.Input(shape=(32,32,3))
print(inputs.shape,inputs.dtype)
dense = layers.Dense(64, activation="relu")
x = dense(inputs)
x = layers.Dense(64, activation ="relu")(x)
outputs = layers.Dense(10)(x)
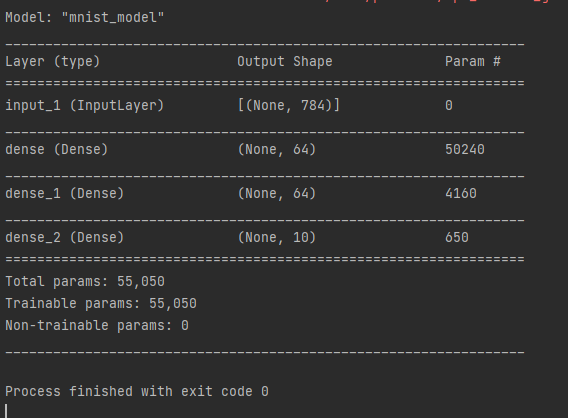
model = keras.Model(inputs=inputs, outputs=outputs, name="mnist_model")
model.summary()<1> 라이브러리 셋팅
import numpy as np
import tensorflow as tf
from tensorflow import keras
from tensorflow.keras import layers
<2> 모델 설계
(input: 784-dimensional vectors)
↧
[Dense (64 units, relu activation)]
↧
[Dense (64 units, relu activation)]
↧
[Dense (10 units, softmax activation)]
↧
(output: logits of a probability distribution over 10 classes)
<3> 모델 작성
<3.1> 입력층 생성
inputs = keras.Input(shape = (784,)) - 784 dimensional vector input layer 생성
( inputs.shape, inputs.dtype 으로 입력층 자료형태 확인 )
<3.2> layer 추가
dense = layers.Dense(64,activation ="relu")
x = dense(inputs)
( 레이어를 먼저만든후 , 객체에 이전 input레이어를 넣고 새로운 변수에 넣어주면됨 )
x = layers.Dense(64, activation = "relu")(x)
outputs = layers.Dense(10)(x)
<4> 모델 생성
model = keras.Model(inputs= inputs, outputs= outputs, name='mnist_model')
( 작성한 모델의 모델 객체를 생성 , input, output을 넣어주면 됨 )
model.summary() 모델 확인 .
<5> 시각화
keras.utils.plot_model(model, "model name")
으로 모델의 구조를 그래프로 확인할수있음
keras.utils.plot_modle(model,"model name", show_shapes=True)
// 모델 shape를 보도록 할수 있음 .
* Note 위 method는
Failed to import pydot. You must install pydot and graphviz for `pydotprint` to work. 에러가 발생함
* pip install pydot
pip install pydotplus
pip install graphiz 를 추가로 설치해주어야지 실행할수있음 .
// 근데 ydotplus.graphviz.InvocationException: GraphViz's executables not found 에러가남
+ 사항으로 조사해야겠음 .
<6> 학습 & 검증
(x_train, y_train),(x_test, y_test) = keras.datasets.mnist.load_data()

x_train = x_train.reshape(60000, 784).astype("float32") / 255
x_test = x_test.reshape(10000, 784).astype("float32") / 255

model.compile(
    loss=keras.losses.SparseCategoricalCrossentropy(from_logits=True),
    optimizer= keras.optimizers.RMSprop(),
    metrics=["accuracy"],
)

history = model.fit(x_train, y_train, batch_size =64, epochs=2, validation_split=0.2)

test_scores = model.evaluate(x_test, y_test, verbose =2 )
print("Test loss: ", test_scores[0])
print("Test accuracy:", test_scores[1])
<6.1> mnist 데이터를 input shape에 맞게 reshape 진행 // mnist 데이터는 28*28*1 데이터임 (이미지 데이터 )
- > 784 Serialize 만든후 0~255 사이의 사이즈 데이터를 0~1의 실수값으로 만듬 .Normalize
<6.2> 최종결과
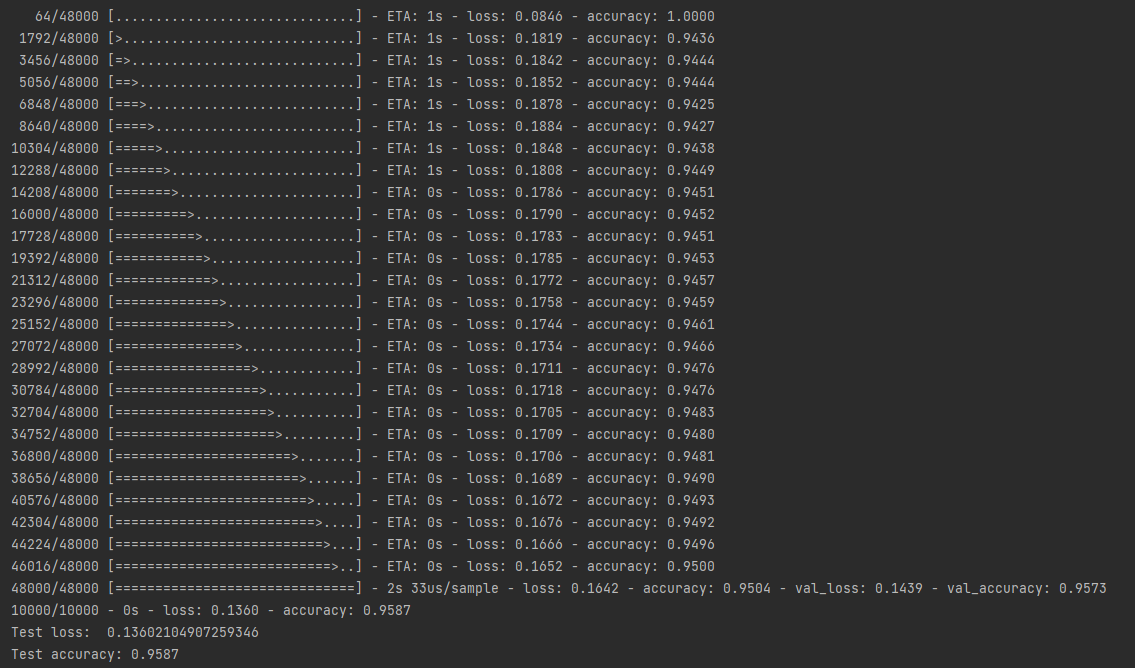
loss , accuracy 측정
<7 > 모델저장
모델 구조 , 모델 가중치 , 컴파일 설정 이 저장됨 .
model.save("path")
del model
model = keras.models.load_model('path")
- 동일레이어 그래프로 다수의 모델 작성가능
import numpy as np
import tensorflow as tf
from tensorflow import keras
from tensorflow.keras import layers

encoder_input = keras.Input(shape=(28, 28, 1), name='img')
x = layers.Conv2D(16, 3, activation="relu")(encoder_input)
x = layers.Conv2D(32, 3, activation="relu")(x)
x = layers.MaxPooling2D(3)(x)
x = layers.Conv2D(32, 3, activation="relu")(x)
x = layers.Conv2D(16, 3, activation="relu")(x)
encoder_output = layers.GlobalMaxPooling2D()(x)

encoder1 = keras.Model(encoder_input, encoder_output, name="encoder")
encoder1.summary()

x = layers.Reshape((4, 4, 1))(encoder_output)
x = layers.Conv2DTranspose(16, 3, activation="relu")(x)
x = layers.Conv2DTranspose(32, 3, activation="relu")(x)
x = layers.UpSampling2D(3)(x)
x = layers.Conv2DTranspose(16, 3, activation="relu")(x)

decoder_output = layers.Conv2DTranspose(1, 3, activation="relu")(x)

autoencoder1 = keras.Model(encoder_input, decoder_output, name="autoencoder")
autoencoder1.summary()
<1> encoder 모델
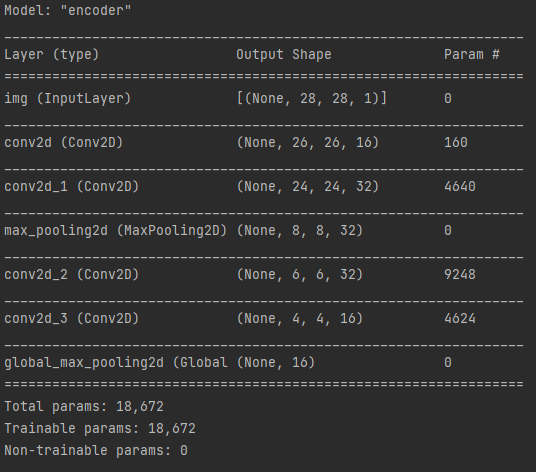
encoder model param - 18,672 ( CNN기반의 이미지 피쳐 추출 모델 )
<2> auto encoder 모델
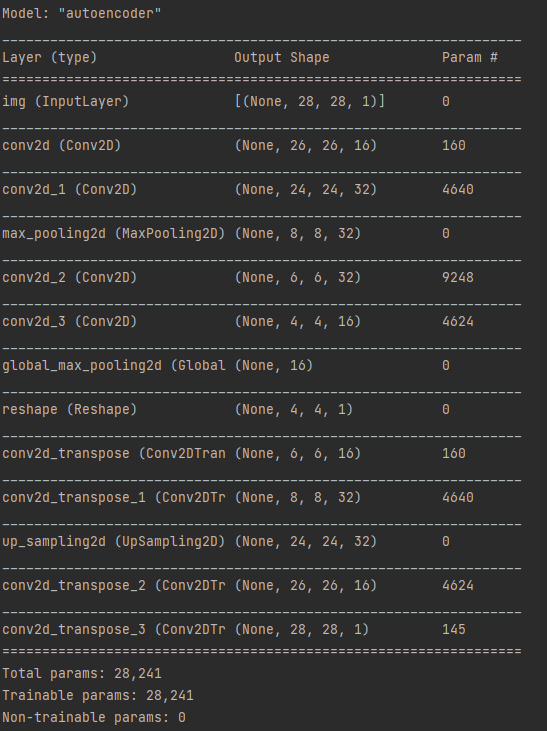
encoder output 모델을 재활용 한 디코더(인코딩된 데이터를 다시 이미지로 복원하는 역할) 로 역할을 함 .
인코더 디코더 = 오토인코더 모델로 정의함 .
* 모델 재활용시 . 아키텍쳐 및 학습된 가중치 값 까지 활용가능함 .
decoder model param = 160+4640 + 4624 +145 = 9596
autoencoder param = 18,672( encoder ) + 9596 (decoder ) = 28,241
- 병렬 모델
import numpy as np
import tensorflow as tf
from tensorflow import keras
from tensorflow.keras import layers

def get_model():
    inputs = keras.Input(shape=(128,))
    outputs = layers.Dense(1)(inputs)
    return keras.Model(inputs, outputs)

model1 = get_model()
model2 = get_model()
model3 = get_model()

inputs = keras.Input(shape=(128,))
y1 = model1(inputs)
y2 = model2(inputs)
y3 = model3(inputs)

outputs = layers.average([y1,y2,y3])
ensembel_model = keras.Model(inputs=inputs, outputs=outputs)
print(ensembel_model)
print(outputs)
ensembel_model.summary()
get_model() 를 보면 input shape 128 에서 output 1로 의 모델을 구성후 m1 m2 m3 모델을 구성
1개의 INPUT LAYER와 3개의 모델 예측값의 Y1 Y2 Y3 출력 얻음 , 마지막으로 OUTPUT LAYER에서 Y1 Y2 Y3의 값의 평균을 구하는 모델임 .

- 다중 입출력 모델 ( Sequential API로는 할수 없는것 )
* Note numpy 1.2x 이상의 버전으로는 layer.LSTM() layer가 돌아가지 않고 에러가 발생하니 - numpy 1.19버전으로 내려야지 실행된다 .
ex) 고객 발권 티켓의 우선 순위를 지정하고 올바른 부서로 라우팅하는 시스템을 구축
- input
- 티켓의 이름 ( text input )
- 티켓의 내용( text input )
- 고객이 추가한 태그들 ( categorical input )
- output
- 0과 1 사이의 우선순위 점수 ( scalar sigmoid output [ sigmoid는 활성함수임 ] )
- 티켓을 처리하는 부서 ( 부서집합에 대한 softmax output )
import numpy as np
import tensorflow as tf
import pydotplus
from tensorflow import keras
from tensorflow.keras import layers
num_tags = 12 # Number of unique issue tags
num_words = 10000 # Size of vocabulary obtained when preprocessing text data
num_departments = 4 # Number of departments for predictions
title_input = keras.Input(
shape=(None,), name="title"
) # Variable-length sequence of ints
body_input = keras.Input(shape=(None,), name="body") # Variable-length sequence of ints
tags_input = keras.Input(
shape=(num_tags,), name="tags"
) # Binary vectors of size `num_tags`
# Embed each word in the title into a 64-dimensional vector
title_features = layers.Embedding(num_words, 64)(title_input)
# Embed each word in the text into a 64-dimensional vector
body_features = layers.Embedding(num_words, 64)(body_input)
# Reduce sequence of embedded words in the title into a single 128-dimensional vector
title_features = layers.LSTM(128)(title_features)
# Reduce sequence of embedded words in the body into a single 32-dimensional vector
body_features = layers.LSTM(32)(body_features)
# Merge all available features into a single large vector via concatenation
x = layers.concatenate([title_features, body_features, tags_input])
# Stick a logistic regression for priority prediction on top of the features
priority_pred = layers.Dense(1, name="priority")(x)
# Stick a department classifier on top of the features
department_pred = layers.Dense(num_departments, name="department")(x)
# Instantiate an end-to-end model predicting both priority and department
model = keras.Model(
inputs=[title_input, body_input, tags_input],
outputs=[priority_pred, department_pred],
)
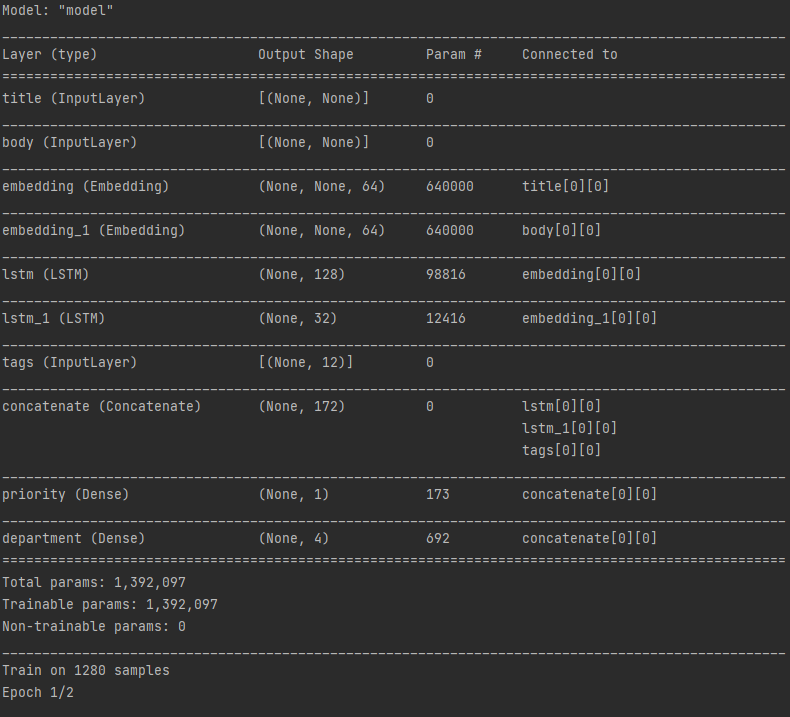
model.summary()
model.compile(
optimizer=keras.optimizers.RMSprop(1e-3),
loss={
"priority": keras.losses.BinaryCrossentropy(from_logits=True),
"department": keras.losses.CategoricalCrossentropy(from_logits=True),
},
loss_weights={"priority": 1.0, "department": 0.2},
)
title_data = np.random.randint(num_words, size=(1280, 10))
body_data = np.random.randint(num_words, size=(1280, 100))
tags_data = np.random.randint(2, size=(1280, num_tags)).astype("float32")
priority_targets = np.random.random(size=(1280, 1))
dept_targets = np.random.randint(2, size=(1280, num_departments))
model.fit(
{"title": title_data, "body": body_data, "tags": tags_data},
{"priority": priority_targets, "department": dept_targets},
epochs=2,
batch_size=32,
)<1>input layer가 3개로 시작함 [ 티켓 제목 ,티켓 내용 , 태그들 ]
<2>layer.concatenate - layer의 출력값을 하나로 합치는것 .
<3>output layer : priority & department Dense로 출력
- model.layer custum.
- 이미 학습되어 제공되는 모델을 재활용 하여 커스텀하는 방법
<1>model.layers member variable을 활용하여 내부 레이어들의 output을 list로 획득
<2> 모델 생성 .
vgg19 = tf.keras.applications.VGG19()

features_list = [layer.output for layer in vgg19.layers]

feat_extraction_model = keras.Model(inputs=vgg19.input, outputs=features_list)

img = np.random.random((1, 224, 224, 3)).astype("float32")
extracted_features = feat_extraction_model(img)
vgg19모델에서 output으로 각 층의 결과를 추출하여 사용하는것 ?
- custom layers - API 확장하기
<> CNN layer : Conv1D, Conv2D, Conv3D, Conv2DTranspose
<> Pooling layer : MaxPooling1D, MaxPooling2D, MaxPooling3D, AveragePooling1D
<> RNN layers: GRU, LSTM, ConvLSTM2D
<> BatchNormalization, Dropout, Embedding,
상위 레이어 클래스를 상속받는 하위 레이어 클래스를 커스텀하여 사용하면됨 .
고려사항
<> call : 레이어의 순전파 기능을 설계
<> build : 레이어의 가중치를 생성 , __init__(생성자)에서도 생성 가능함
#=============================================================
#build에 가중치 및 바이어스의 형태에 대해 변수 지정
#call 에서 계산 그래프를 통해 순전파시 행할 작업을 지정
#=============================================================
class CustomDense(layers.Layer):
    def __init__(self, units=32):
        super(CustomDense, self).__init__()
        self.units = units

    def build(self, input_shape):
        self.w = self.add_weight(
            shape=(input_shape[-1], self.units),
            initializer="random_normal",
            trainable=True,
        )
        self.b = self.add_weight(
            shape=(self.units,), initializer="random_normal", trainable=True
        )

    def call(self, inputs):
        return tf.matmul(inputs, self.w) + self.b

    def get_config(self):
        return {"units": self.units}


inputs = keras.Input((4,))
outputs = CustomDense(10)(inputs)

model = keras.Model(inputs, outputs)
config = model.get_config()

new_model = keras.Model.from_config(config, custom_objects={"CustomDense": CustomDense})
#===================================================================================

#=============================================================
def from_config(cls, config):
  return cls(**config)
#=================================
#compare
#=================================
inputs = keras.Input(shape=(32,))
x = layers.Dense(64, activation='relu')(inputs)
outputs = layers.Dense(10)(x)
mlp = keras.Model(inputs, outputs)

#==================================
#클래스 상속 방식 모델링
#==================================
class MLP(keras.Model):

  def __init__(self, **kwargs):
    super(MLP, self).__init__(**kwargs)
    self.dense_1 = layers.Dense(64, activation='relu')
    self.dense_2 = layers.Dense(10)

  def call(self, inputs):
    x = self.dense_1(inputs)
    return self.dense_2(x)

# Instantiate the model.
mlp = MLP()
# Necessary to create the model's state.
# The model doesn't have a state until it's called at least once.
_ = mlp(tf.zeros((1, 32)))
call에서 순전파시 해당 모델이 사용할 레이어의 흐름을 정해주면됨 .( RNN )
- mix match modeling
units = 32
timesteps = 10
input_dim = 5
batch_size = 16


class CustomRNN(layers.Layer):
    def __init__(self):
        super(CustomRNN, self).__init__()
        self.units = units
        self.projection_1 = layers.Dense(units=units, activation="tanh")
        self.projection_2 = layers.Dense(units=units, activation="tanh")
        self.classifier = layers.Dense(1)

    def call(self, inputs):
        outputs = []
        state = tf.zeros(shape=(inputs.shape[0], self.units))
        for t in range(inputs.shape[1]):
            x = inputs[:, t, :]
            h = self.projection_1(x)
            y = h + self.projection_2(state)
            state = y
            outputs.append(y)
        features = tf.stack(outputs, axis=1)
        return self.classifier(features)


# Note that you specify a static batch size for the inputs with the `batch_shape`
# arg, because the inner computation of `CustomRNN` requires a static batch size
# (when you create the `state` zeros tensor).
inputs = keras.Input(batch_shape=(batch_size, timesteps, input_dim))
x = layers.Conv1D(32, 3)(inputs)
outputs = CustomRNN()(x)

model = keras.Model(inputs, outputs)

rnn_model = CustomRNN()
_ = rnn_model(tf.zeros((1, 10, 5)))- call(self, inputs, **kwargs)
- input : tensor
- call(self, inputs, training=None, **kwargs)
- training : layer mode ( training mode , inference mode )
- call(self, inputs, mask=None, **kwargs)
- mask tensor
- call(self, inputs, training=None, mask=None, **kwargs)
- masking & training
- get_config :method 는 serializable & cloneable 가능하게함 .